SUPPORT 0007 HOW TO SCAN AND REMOVE VIRUSES.jpg__PID:e3d66a1e-eb60-4b70-8797-ec2f3a6396d6

HOW TO SCAN AND REMOVE VIRUSES

STEP 1:

First, click your Windows logo or search bar at the bottom left of your screen.

SUPPORT 0007 PHOTO 1.jpg__PID:7b7a21db-8b2b-4ceb-989e-35298fb13532

STEP 2:

Type in "Virus & Threat Protection" and click on "Virus & Threat Protection".

SUPPORT 0007 PHOTO 2.jpg__PID:7a21db8b-2b9c-4b18-9e35-298fb13532b3

STEP 3A: QUICK SCAN

Click on "Quick Scan" to perform a scan of your PC.

Performing a "Quick Scan" will check folders in your PC where threats are commonly found.

This process will be a lot quicker than completing a "Full Scan".

SUPPORT 0007 PHOTO 3.jpg__PID:21db8b2b-9ceb-489e-b529-8fb13532b358

STEP 3B: FULL SCAN

To perform a "Full Scan," click on "Scan Options."

Performing a "Full Scan" will check ALL files and folders on your PC. This process may take over an hour so it would be best to perform this task overnight.

SUPPORT 0007 PHOTO 4.jpg__PID:db8b2b9c-eb18-4e35-a98f-b13532b35891

Select the "Full Scan" option.

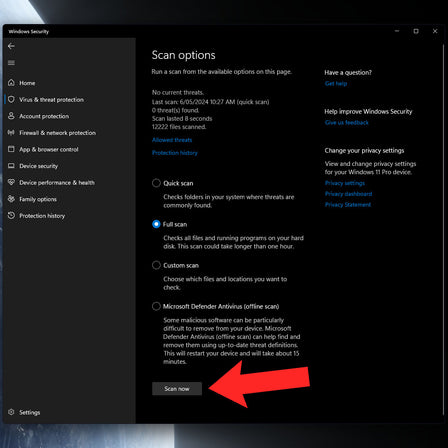
SUPPORT 0007 PHOTO 5.jpg__PID:8b2b9ceb-189e-4529-8fb1-3532b35891ea

Click on "Scan Now."


SUPPORT 0007 PHOTO 6.jpg__PID:2b9ceb18-9e35-498f-b135-32b35891ea5e

STEP 4:

Windows will begin to scan your PC for any threats and viruses.

SUPPORT 0007 PHOTO 7.jpg__PID:9ceb189e-3529-4fb1-b532-b35891ea5e67

STEP 5:

Once completed, you will receive a notification with your results.

SUPPORT 0007 PHOTO 8.jpg__PID:eb189e35-298f-4135-b2b3-5891ea5e67a9

GET A 100% CUSTOM PC

ORANGE BUTTON.png__PID:2523cdf3-8197-4ec4-918a-7d8fd52efe70ORANGE BUTTON DARK.png__PID:cdf38197-eec4-418a-bd8f-d52efe7017ef

SUBMIT A SUPPORT TICKET

BLUE BUTTON.png__PID:496985cd-2345-4344-866d-c943b4e1420eBLUE BUTTON DARK.png__PID:2345d344-466d-4943-b4e1-420e56467ec6